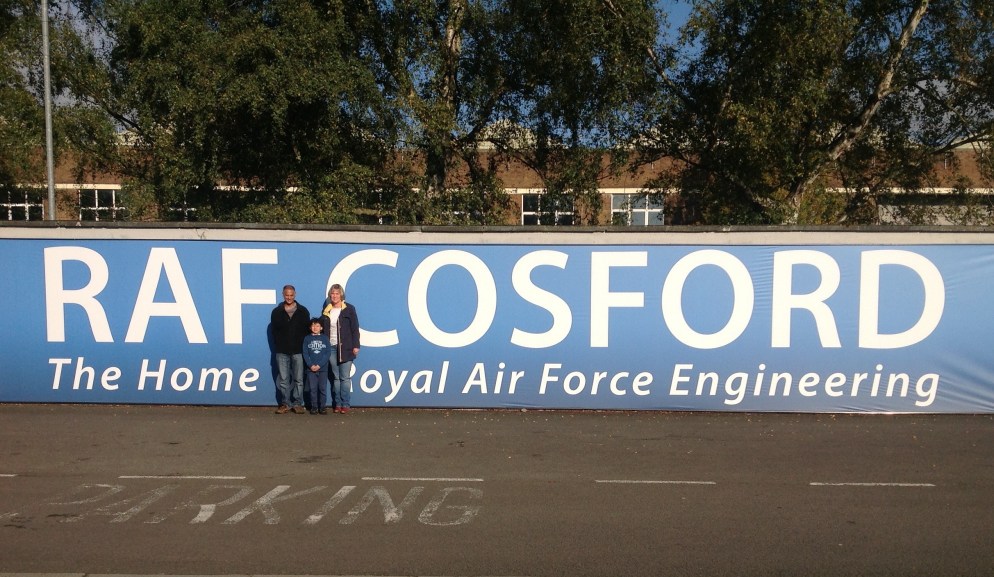
Big Tinker & mini Picademy

The past few days have seen some key events in our Think Like an Engineer project. Last week we held our first Big Tinker – the opportunity for each class in school to spend a session focussing on an engineering activity. This can be linked to another area of the curriculum, such as Literacy, or as a stand-alone tinker. We will be holding these on a regular half-termly basis, alongside our termly Engineering Days to keep the momentum going.

Teachers are given a free reign, with the stipulation that children need to have time to discuss and plan their ideas before launching in to the making. For KS2, it was suggested that they try out one of the activities demonstrated on the recent BBC2 programme: Astronauts: Do you have what it takes? This involved building the highest tower possible with A4 paper and paperclips, which had to stand for 30 seconds. The astronauts had a time limit of 20 minutes, of which the first five minutes were spent discussing their ideas, standing back to back. For the remaining 15 minutes, whilst building the tower, they were only allowed to communicate through facial expressions and gesticulations.
Year 5 & 6 took part in the challenge in the school hall and could communicate fully. The Year 4 children were asked to work in silence, which they found very difficult. As a result, their attempts were much less successful. Despite this, a considerable amount of learning went on, and it became clear how important it is to hold these regular events as a reinforcement of engineering habits of mind.

The winning tower measured 112 cm high – not at all bad, considering the potential astronauts managed just over 200 cm.

The infants had their own ideas and their Big Tinkers ranged from bottle top catapults, inspired by a Beavers’ activity to making flotation devices in Year 2. The most important aspect for me though, was that everyone had fun and engineering continues to be alive in school.

The Year 5s did some more paper engineering earlier in the week, when they investigated hoop gliders.

Picademy

Today we were lucky enough to have yet another visit from the dynamic duo: Pete Lomas and Tim Wilson. This time they brought with them a wealth of goodies: namely a large collection of Raspberry Pis complete with Sense HATS – a board which was taken up to the ISS during Tim Peake’s Principia mission. As the children had never encountered Pis before, there was considerable excitement in the room whilst the equipment was being sorted out.

IMG_6704

The children organised themselves into groups of 3 and set up their Raspberry Pis using a pi-CEED as their display device. It was impressed by how the children were able to confidently plug everything together. Having installed Raspbian, they were then ready to experiment with Python.

IMG_6705

There were three programming activities for the SenseHAT, which worked well as it meant that everyone in the group had the opportunity to enter some code.

Make-a-Sense-HAT-smile-with-sensors
Make-Random-Sparkles-on-the-Sense-HAT
Sense-HAT-sensors

The children soon learned that it was critical to copy each line down correctly, just a it appeared on the worksheet – any incorrect syntax or missing spaces meant that the program just wouldn’t run. There was a lot of problem finding going on. Both Pete and Tim were impressed by the children’s resilience. And, once they had run the program successfully and became more familiar with Python, then they started to modify the code.

The next step will be to complete Astro Pi: Mission Zero using an online Sense HAT emulator to create the program. No hardware is needed, as everything is done in a web browser. The completed program is then actually run in space on the International Space Station (ISS)! How cool is that!

Thank you Tim & Pete and the Raspberry Pi Foundation for giving us these wonderful opportunities.

Live Cardboard Hacking Day

IMG_6381 (Edited)This Monday we were delighted to welcome Pete Lomas, the creator of the hardware for the first Raspberry Pi, and Tim Wilson, Regional Coordinator of Code Club in the West Midlands, to our school. They had both heard about our Think Like an Engineer project and were keen to visit and share their expertise with us.

The day began with an excellent presentation by Pete, who talked about how he had progressed from messing about with cardboard boxes and train sets as a boy, to developing the third most successful computer in the world – the Raspberry Pi. The message was simple: it is never too early to start inventing.

Tim had come to give some of the older children a mini Picademy session, but unfortunately, the Internet was down, so they were disappointed. He has however agreed, very generously, to come back in September and do some work with the Raspberry Pi Sense HAT, which Tim Peake played with aboard the ISS – can’t wait!

In the middle area, Pete and Tim laid out all manner of interactive Raspberry Pi activities to engage the children, who were all very interested in how coding works.

The rest of the time was devoted to hacking cardboard. This had been suggested by Pete himself, as an engineering focus for the day. Parents, teachers & children gathered together in their classrooms amongst mounds of cardboard, glue guns and cutting implements. There were Pirate Ships being built in Year 1, castles and buildings from the recent trip to Llandudno in Year 2 and cardboard cranes in Year 3, which were powered by syringes – very inventive.

Year 4 focused on furniture and large-scale cardboard animals, including a spectacular giraffe; whereas Years 5 & 6 worked collaboratively to produce fun fair elements.

This slideshow requires JavaScript.

Everyone gathered together in the hall at 2:30pm to see what had been created and for the judging from Pete and Tim. It was an extremely hard decision, but in the end, after much deliberation, a group of Y5&6 boys won with their massive theme park design.

Despite the earlier disappointments, it had been a fantastic day. It was particularly pleasing to see parents working alongside their children. We had some very positive comments:

Mr Randall,

Just to reiterate how much I thoroughly enjoyed the School’s Cardboard Hacking Day on Monday and how much I thoroughly admired the collective effort and close class management required to make it happen. I believe that I speak for Craig (Chloe’s father) as well.

I’d like to reiterate too that I would delighted to assist in your class (or indeed any other) for any future “special days” between now and the end of school year.

Tom Downey (parent and engineer)


“Cardboard hacking with year 4 earlier this week was great fun; seeing the imagination and creativity flow as the children worked together, interpreting the brief in so many different ways, was fascinating. But it was also wonderful to see the children being encouraged to take responsibility for their own learning, learning from their mistakes and then presenting themselves, and their creations so well – and with pride. These are all such great life-skills.  

And, as a local employer, I should also add that it is so encouraging to see the children developing these transferable skills that are so vital, and will really help them to stand apart, in the workplace in future. But I have to admit a little bias, as a hydraulic engineering company, towards the year 3 girls’ hydraulic grab made from cardboard and syringes. Wow! Super-impressed! Maybe they would like to come on a work placement and help with some system design projects in a few years’ time?”

Helen Baker (Director)
Hydraulics Online


Dear Mrs Wiskow

I would just like to say what an enjoyable morning I had with year two on the ‘Think like an Engineer’ cardboard hack day. The children were really involved in their projects and showed a great enthusiasm for construction and problem solving. I was particularly impressed with some of the boys groups and how well they worked as a team at providing solutions to some of the more challenging aspects of their projects. Keep up the good work!!

Regards
Narissa Mather


And don’t forget, throughout this process we are trying to encourage our children to use Engineering Habits of Mind, so how did they exhibit these:

Claris Y5 – “We were going to use micro:bits, but the Internet was down, so we used an LED circuit to make it work.” (creative problem solving)

Megan Y5 – “We could change the height of the wheels so that it would be more balanced and we could make it stronger.” (improving)

Jack Y5 – “We found out that we needed a more powerful battery to make our ferris wheel move round.” (problem finding)

Rohan Y5 – “We found that our wheels needed to be put on very tightly.” (problem finding)

Jake Y5 – “We took our design apart and then we built it again.” (improving)

Isobel Y5 – “We talked about whether our design would be possible to create.” (systems thinking)

Charlotte Y4 – “Looking at a number of pictures of giraffes helped us design a better model. It turned out a lot better than we thought.” (visualising)

Rebecca Y4 – “We improved the design of our giraffe by not sticking our animal together. We can dismantle it to move it about more easily.” (improving)

Marie Y4 – “To make my lamp sturdier, I could have put a hole in the base.” (improving)

Emma Y4 – “The problem was that the pencil holder was too high, so we cut a hole in the desk and slotted it in.” (adapting)

Chronicle article


Learning about Pulleys

DSC04231
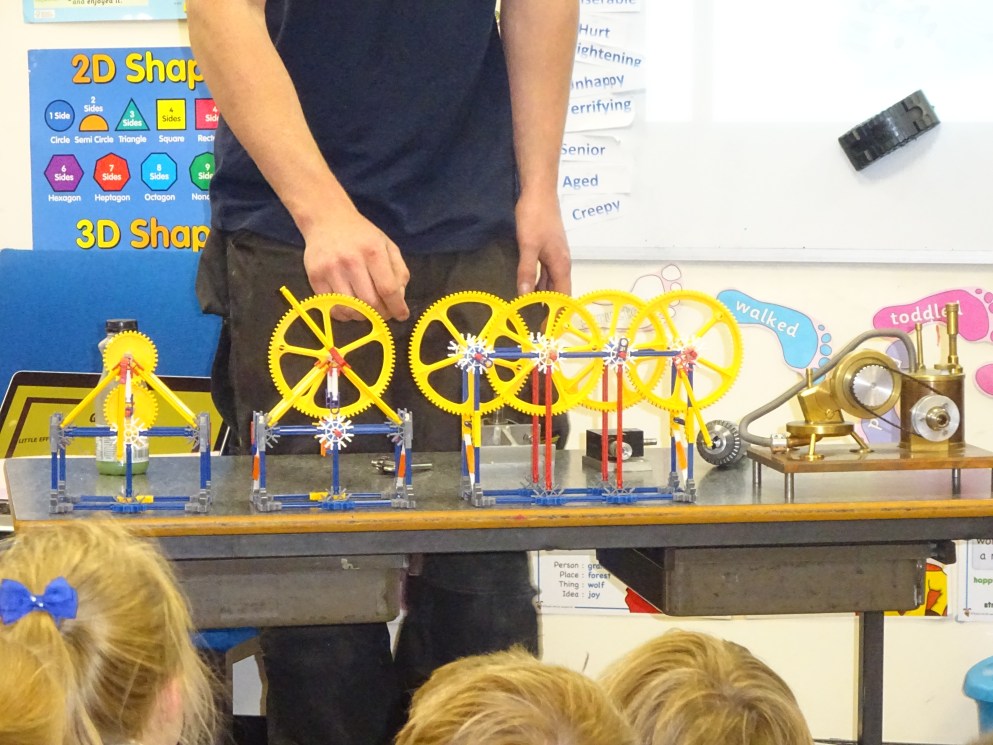
The third simple machine introduced to the Year 3 children was the pulley. As with gears, pulleys are used to make our lives easier – small effort in: big effort out. Pulleys have been used for thousands of years to help life heavy objects – the first records of pulley uses date back to Mesopotamia, where people used rope pulleys for hoisting water as early a 1500 BC.

We learned that a pulley is simply a wheel, with a groove on the outside for a rope or a cable, which may be attached to a load. The more pulleys that are used in a system, the easier it is to lift the load.

The children were asked if they could think of examples of where pulleys are used. They found this more difficult than thinking of levers and gears. As well as cranes, we came up with the action of lifting water from a well; rock climbing and pulling fish in with a rod.

WPulleye looked at the different parts of the pulley and noticed that they were similar to the other simple machines that we had looked at.

This time the effort refers to a pulling force.

The children remembered the terms very well and had no problem identifying the various components.

There are three basic kinds of pulleys: fixed pulleys, moveable pulleys and combination pulleys.

This table, taken from the K’nex Levers & Pulleys manual, gives an excellent summary:

Table of pulleys

In all the simple machines that we have looked at in Year 3, mechanical advantage has been the key. This is the amount of help you can get from using a machine to do a job, instead of just using purely your own strength.

Table of pulleys 2

Mechanical advantage is a ratio between the number of pulleys and the amount of effort needed. If you have a single pulley then there is no mechanical advantage: you are having to put in the same effort; although being able to pull down, in the same direction as gravity, does make it easier.

If you have a two pulley system, then you have to put half the effort in. It’s as though you are now twice as strong. The mechanical advantage is 2:1.

The children found this maths quite easy to understand and were soon able to work out the mechanical advantage for any number of pulleys: 150 pulleys would require 1/150 of the effort – MA 150:1. This is a really useful way to introduce ratio to younger children.

There are however, some disadvantages to using pulleys, which applied to levers and gears too. The more pulleys you have in your system, the longer the rope needs to be. For example, if you have 150 pulleys, then you will have to pull a rope that is 150 times longer than if you had only 1 pulley – this might end up being an awful long distance to pull.

This simple table provides a summary:

Simple Machines Advantages Disadvantages
Levers Lift heavy objects Long levers
Gears Go up hills Slow
Pulleys Pull heavy objects Lots of rope

The children were then tasked with constructing their own pulley systems, which they did extremely well. They had to remember that one fixed pulley didn’t offer any mechanical advantage.

This slideshow requires JavaScript.


Learning about Gears

The third engineering lesson for the Year 3s was about gears and how they work. There was quite a lot of hard maths involved, but the children didn’t seem to notice.

DSC04192

We learned that gears are basically wheels with teeth around the outer rim. When they are used in a gear system, they can make things easier to move. The teeth on two gears fit together allowing one gear to turn the other. In a simple two gear system, when you rotate one of the gears clockwise, the other gear will rotate in the opposite direction. As well as being able to change the direction of rotation, gears can also change the rate of rotation.

DSC04193

The first question for the children was: “Where do we find gears?”

Examples given were – a gear box, hand whisk, drill, bike and clock.

Just like levers, there are different kinds of gears:

–         A driver gear to which the effort is applied

–         A driven gear that moves the load

–         An idler gear that makes the gears on either side of it move in the same direction

Links to Numeracy

Ratios are heavily involved in this topic, which is something that is not covered in the Year 3 maths curriculum; however, it is quite easy to see watch how many times one wheel goes around in relation to the other.

Basically, if the driver gear is larger than the driven gear, then it will increase the turning speed. This is called gearing up.

Conversely, a small driver gear turning a large driven gear slows the turning speed. This is called gearing down.

Luke and Will had brought a bicycle with them to demonstrate how changing gears can help your cover more ground faster or cover steeper ground slower. (I guess that’s why they need to come in a van!)

–         Climbing a steep hill on a bike can be difficult – using a small gear to drive a larger gear will mean that you need to apply less force to the pedals . (This would be a low gear).

–         A large gear turning a small gear is a high gear. This is best if you want to cover the ground more quickly.

DSC04197

Now the children had seen gears in motion, it was time to look more closely at those ratios.

Ratios are always concepts that children find quite difficult to understand – perhaps we should always use gears to explain them.

There is a simple formula that you need to follow:

The number of teeth on the driven gear         =  mechanical advantage (increase in force) The number of teeth on the driver gear

gear_ratio_anim

40    =   2
20

In this example Gear A needs to be turned twice to rotate Gear B.

The concept of gears fits very well into the Year 3 topic of canals as, of course, lock gates are controlled by a system of gears. If we didn’t have gears then it would be impossible for one person to open such a heavy object.

Having learned all this, the children then had the opportunity to apply their knowledge and make some gear systems with the K’nex equipment.

The children were then able to share their new skills in Friday’s assembly.

DSC04222

And here are Molly and Johnny explaining what they understand about gears:

Did you know that gears don’t have to be round? Check this video out!

Learning about Levers

In the afternoon of Thursday 2th April, the Year 3s were treated to their second engineering session from Luke Bladen and Tom Kelly – engineers at Daresbury Laboratory, who are currently working with Rode Heath to develop a fundamentals engineering programme. To help us with the practical activities, we have invested in a K’nex class set of Simple Machines, which includes gears, pulley and levers: https://www.amazon.co.uk/KNEX-STEM-Simple-Machines-Classroom/dp/B00F6T8NXQ/ref=sr_1_fkmr0_4?ie=UTF8&qid=1487404732&sr=8-4-fkmr0&keywords=k%27nex+simple+machines+glass+set

IMG_6191

This session was all about levers and how we can use them to make our lives easier. We learnt that levers are useful, simple machines that are found in many places. The children were able to identify many examples of levers in the Year 3 classroom – hinged doors, crocodile clips, staplers, staple removers and scissors.

Having discovered that their environment was full of levers, the children learned about the 3 points in a lever: effort, load and fulcrum. This was going to be important later on when they built their own levers and had to identify what class they were.

By simply demonstrating how a penny could be used as a lever to open a golden syrup tin, (goodness knows what happened to the all syrup from those empty tins – did they really eat it?), Luke was able to show how by using increasing the length of the levers – from the penny to a small screwdriver, followed by a much longer one – he was able to make it much easier to open the tin.

In fact, if he doubled the length of the lever, then this halved the effort required. Already I was thinking about how we could use this is in our maths lessons.

The final piece of information we were given, before the children set about making their own levers with K’nex, was that there are three basic types of lever: class 1, 2 or 3. They all share the same components; the difference is the order in which the fulcrum, load and effort are placed.

As you can see from the slide below, different classes of lever are better for particular jobs.

Examples of 1st Class levers: Seesaw; crowbar; the claw of a claw hammer; oars on a rowboat; scissors (2 connected 1st Class levers).

Examples of 2nd Class levers: Wheelbarrow; Paper cutter (guillotine); Hinged door; Nutcrackers (two 2nd Class levers.)

Examples of 3rd Class levers: Stapler squeezed by hand; hammer driving home a nail; fishing rod; tennis racquet; baseball bat; golf club. Tweezers and ice tongs are examples of two 3rd Class levers working together.

(K’nex have an excellent guide to Levers and Pulleys which comes with their kit of the same name; 78610-TG-Levers-and-Pulleys)

The rest of the session was spent using the class K’nex set to make different classes of lever. As usual with engineering sessions, the children were very engaged and quickly set about producing all manner of ideas. Again, success was achieved by those who sometimes struggle with the more academic subjects. As well as creating their examples, the children were encouraged to think about what class of lever they had made.

This slideshow requires JavaScript.

Perhaps the highlight of the afternoon was when Mr Randall and I were able to play on the seesaw. It quickly became apparent, that I was at least as heavy, if not heavier, than my colleague!

Next it was the children’s turn. By using the seesaw they could clearly see what happened when you increased the weight on one side – you had to increase the distance from the fulcrum on the other side if you wanted the seesaw to balance. This physical demonstration was so effective, that it made Mr Randall and I think of dusting off our old balance scales from the maths cupboard and bringing them back into use.

The children certainly enjoyed the afternoon and learned a great deal.

We can’t wait for our next session on gears.


The growing impact of EHoM

On March 21st, we invited teachers from our Tinker, Tailor, Robot Pi group to visit Rode Heath to see how we are embracing Engineering Habits of Mind in our school.

Each class enthusiastically shared an aspect of their engineering practice. The activities were wide and varied:

  • Reception – everything, from investigating pulleys by trying to get food into a giant blow-up dinosaurs mouth to diverting the path of water using bamboo. Everyone’s such a natural engineer in this class.
  • Year 1 – designing and making backscratchers.
  • Year 2 –  incorporating engineering into Literacy (The Dragon Machine) by making a boat for George to travel across the raging river.
  • Year 3 – testing structures with a jelly wobbler powered by Crumbles.
  • Year 4 – incorporating engineering into Science by creating Northern Light effects using squishy circuits.
  • Year 5 – incorporating engineering into History & Literacy with their bridge building activity.
  • Year 6 – thinking outside the box with their box creating project.

In Year 5 at the moment we are lucky to have Natalie Bowers, who is working as an Associate Teacher with Rode Heath. She was tasked with linking EHoM with their Viking topic, so she chose to focus on the mythical Viking bridge Bifröst, as referenced in Tony Bradman’s Viking Boy.

Here is a copy of the PowerPoint she produced for her lesson.

Bridge Buildng Power Point

What is of particular interest are her views on how children are responding to our Think Like An Engineer project and whether she feels that this way of working is something that she may adopt in her own teaching.

Here is what she has to say:

Recently, I have been fortunate enough to deliver my first ever Engineering lesson, which provided the perfect opportunity to delve further into the notion of Engineering Habits of Mind (EHoM).

During a reflective mini-plenary, I questioned pupils about the concept and what it meant to them and was blown away by the depth of knowledge and self-awareness that they conveyed.

“We use EHoM every day!” they exclaimed.

“How?” I asked. To which they answered with a succinct definition of the approach. They also revealed a clear understanding of how EHoM positively impacts on their learning throughout the curriculum, identifying the use problem solving skills to recognise and rectify their errors; visualisation to focus on their desired goals and systems thinking to approach challenges logically.  Intrigued, I investigated further.

“Surely you can’t use EHoM in other subjects like PE, can you?” an enquiry which was immediately met with a definitive “YES!”, “we visualise our goals and try new techniques to improve.” Throughout the subsequent lesson children demonstrated their proficiency in applying each of these habits of mind, confirming just how successful an approach it is. 

In my short time at Rode Heath, I have become gripped by this ideology and now strive to embed it within my own personal pedagogy. I am both thankful and excited to be working in such a forward-thinking school, with such an innovative and unique ethos.

Natalie Bowers
Associate Teacher

It is really encouraging that a student coming into our school can see the impact that our project is having on the children, and, more importantly, want to share it with others.

For more information on Engineering Habits of Mind you should read the latest report by the Royal Academy of Engineering: http://www.raeng.org.uk/publications/reports/learning-to-be-an-engineer


Year 6 desk designs for Siemens

What an amazing relationship Rode Heath is developing with Siemens in Congleton.

Earlier this year Marc Fouldes and Joanne Mellor spent the day with Years 5 & 6 teaching them about the Lean principles of manufacturing. And, on Wednesday 22nd March, the Year 6 class visited the Congleton site to learn which pupil was the successful winner of the Desk Design competition.

The children had been tasked in February with creating their ideal desk for the classroom. They had to think about the positive aspects of their existing desks and how they could be improved. Questions such as ideal height, shape, adjustability and comfort were considered.

Having planned their designs, the children then drew them in their Engineering Log Books and a number were put forward to Siemens for judging. The winning desk was then drawn on a Siemens CAD system and put into the VR Cave for the children to view in 3D on their arrival.

Here are a few of the shortlisted designs:-

This slideshow requires JavaScript.

The winning desk was designed by Charlotte Hibberd, who impressed the judges with her attention to detail and the excellent range of gadgets that she had included.

Charlotte 1Charlotte 2

Charlotte has written about the day:-

Visit to Siemens

We were asked by Siemens to design our own desk as part of our Engineering Project. My design had a pop-up Google screen, a drinks container and a spell check button on it. Siemens created the winning desk in their virtual reality room and I was lucky enough to win the ‘create a desk’ competition. We visited Siemens so that all the class could see my design come to life.

When we arrived at Siemens we had a presentation about all the work that they company does around the world.

Afterwards, we were taken to the virtual reality room, which had a computer with a 3D screen and a controller to move the 3D image around. I saw my own desk come to life on the 3D screen. I could move the desk about, walk around it and pretend to site on the chair; it looked exactly like my design. It was so cool!

For the next activity, we split into groups of 5 to play a team building game called ‘Sneak a Peek’. Each team took it in turns to send a spy to look at a Lego model of a building. They had to return to the team to tell them what to build with their Lego pieces to recreate the building. They were not allowed to touch the Lego themselves. Each person had a turn at being the spy. I found it tricky not to touch the Lego myself and trying to tell the others which pieces to move was not easy either.

It was a really interesting day out – the best bit was seeing my own design for real!

By Charlotte Hibberd

And here are the CAD drawings of her desk.

What an amazing experience! I can’t wait to see what are next joint venture will be!

Thank you so much Siemens.

This slideshow requires JavaScript.


I’m An Engineer Get Me Out of Here

imascientist-logoOver the past few weeks Year 4 have been taking part in the I’m An Engineer Get Me Out of Here event funded by the Royal Academy of Engineering. This is a free online event where school students meet and interact with engineers. Before the event started, the children were asked to think of three questions that they could ask about engineering. Some excellent examples were generated.

We spent the first Monday afternoon following the half-term holiday looking at the website and getting to know the engineers – what their hobbies were, what music they liked etc. We then, as a class, decided what we thought the 5 most important criteria were for an engineer. There was a long list to choose from, but after some debate, we agreed on the following (in no particular order):-

  1. My work finds new uses for unwanted materials.
  2. My work helps save people’s lives.
  3. I work to make our soldiers safer.
  4. I make things really efficient.
  5. I go to events like lectures and press conferences to tell people about my work.

There was then an opportunity for the children to start posting some of their questions onto the website. We had opted for what was called the Ampere Zone which was general engineering. This fitted in well with our current Electricity topic, as we were able to look at the meaning of ampere and were it originated.

As this was a general engineering zone, the six engineers we were chatting with were from very different backgrounds – all very interesting: – one makes the water flushed from toilets drinkable, one builds wind farms in Africa and one studies how to create new smart and flexible wings for airplanes; one 3D prints spaceships, satellites and armoured fighting vehicles out of metal, one manages distance learning programmes, and another designs systems that drive trains automatically. Wow! Lot of potential here for learning.

Our questions posted, we sat back and waited. Over the next few days we checked the website on a regular basis to see if we had received any answers. The children each had their own individual user names and passwords, so they could do this at home, as well. Most mornings someone came in with the exciting news that they had received a response. We made sure that they were printed out and stuck in our Homework books with the original questions.

Here are some of the answers we received. See if you can work out the questions!

This slideshow requires JavaScript.

On Tuesday 16th March, we had booked a Live Chat with the engineers. This involved half an hour of the children bombarding the engineers with questions in a live session. The conversations were tracked on the screen and there was a whoop of excitement whenever someone had their question answered. Everyone was very engaged during the half hour and all agreed that it was a very worthwhile activity to take part in and they would recommend it to other teachers. All I can say, is that it must have been exhausting for the engineers at the other end, trying to keep up with 32 children typing at them!

IMG_6076

The children kept a note of the answers they received and copied them into their books immediately after the session. It has certainly given them a lot to think about, and widened their understanding of what it means to be engineer.

There was also a link that appeared on the screen after the live session had finished, which allowed us to download the entire chat transcript.

I would recommend this to anyone interested in promoting engineering in their school. And, it was very easy to do.

https://imanengineer.org.uk/


Programming Drones in Year 4

Today was our first Rodeheath session with Skill Supply, learning about drones. The Year 4s were very excited and clearly demonstrated their growing understanding of engineering with their confident responses to questions. They could tell their instructors that engineers: “Make new things, but also improve existing products by making them better.” And, they talked knowledgeably about the Engineering Habits of Mind that engineers use in their day to day work – habits that we are introducing throughout the school with our Think Like an Engineer project.


IMG_6033
When the children arrived this morning they were surprised to see a large enclosure.

All in all, this day’s activity fitted in perfectly with our goals. Initially, the children were given a series of pictures and asked to identify how drones might be used in different situations. This generated some very imaginative and interesting answers. It was agreed that there were many positive uses, including transporting medical supplies to remote areas and using thermal imaging technology to trace people trapped as a result of natural disasters.

Soon it was time to try some activities. The first was simply to programme the drone to move forwards and then backwards from and to a designated point. This was to help the children decide how to judge distances using time and motion. The children were using Parrot Drones and programming using Tynker Coding – an app which looks just like Scratch, something they are very familiar with.

To contain the drones and ensure that the activities were both safe and manageable, a large enclosure had been erected in the classroom, surrounded by thick black netting. The children worked very successfully in groups of three, with half the groups flying the drones at any one time. Each group was provided with an engineering workbook into which all their planning, programming, reflection and improvements were entered. Different roles were assigned to the children, which they then swapped around as the activities progressed. By the end of the day this meant that everyone had tried each responsibility.

This slideshow requires JavaScript.

Not everyone succeeded first time with their programming, especially as the tasks become more complex, but each group learned from their experiences and could modify their code to improve their outcomes.

One of the important lessons learned was that reducing the speed of the drone to 50% gave a better result. By repeatedly trying out the code, the children were soon able to work out how far their drones would travel in a defined number of seconds: at 50% speed, this was about 0.5m per second – still quite fast. Having learned this, it became much easier to place their drones in specific locations. There was also an ‘emergency’ piece of code, which could be activated if the drone got into difficulty – something which happened quite frequently at the beginning, as the over exuberated children sent their drones hurtling into the netting at the back. The emergency feature stopped the props spinning immediately and saved the motors from burning out. It soon became fairly redundant though as the children become more proficient.

The second task was entitled “Prime Delivery” and this mimicked sending the drone to deliver a parcel safely. The children had to land the drone at the back of the enclosure, wait (for the parcel to be retrieved) and then come back to base. I was really pleased to see how the children were learning from their first task and this was executed much more successfully by most groups.

One of the useful tasks that drones undertake is to inspect buildings as they are being erected. This makes life much quicker and safer for the engineers. The third task was called ‘High Rise’ and involved the children sending the drone around a set of steps and landing on one of the levels, before returning safely to base. This proved more challenging for the Year 4s; although they persevered well and just found they had to adapt their code more often this time.

It was great to see the children so engaged on their tasks and lovely to hear the absolute whoops of joy as their missions met with success. I will be intrigued to read the entries in their workbooks to see how they have documented their approaches to problem solving and adapting their initial ideas.

Thank you, Skill Supply, for a wonderful day – the first of many drone workshops. Indeed, we are looking forward to receiving the Airblock modular drones that we backed earlier in the year on Kick Starter. Now, I feel that we have a good grounding in how to operate them.

Here are some thoughts on how the children felt they were using EHoM:


Lean Lego Simulation with Siemens

Marc Fouldes and Joanne Mellor from Siemens in Congleton recently spent the day with the Year 5s and 6s of Rode Heath Primary, teaching them the Lean principles of Manufacturing. This session is one of a series of activities planned by the company to help the school with its engineering project.

The task was to build as many Lego carts as possible in a specified time frame. Each session comprised a team of 12 children working together. Initially, the participants were faced with several constraints: they were not sitting in the natural order of production; they had to wait for designated children to feed them with new parts and they were not allowed to pass their completed pieces to the next stage in the production line – this was done by other children, acting as line feeders.

After 4 minutes, the activity was stopped and the children could make changes to improve the efficiency of production. All the teams decided to rearrange the work areas to improve the flow and move the required components directly in front of them to speed up the manufacturing process.

 With these changes the children were able to produce twice as many cars in the same amount of time – something they didn’t originally believe could be done. The day was a resounding success, with the winning team, “Lego Busters”, from Year 5, receiving an impressive trophy from Siemens. The children are already thinking about how they can apply what they have learned in their day to day practice in the classroom.

This slideshow requires JavaScript.

The children have written about their experiences:

Siemens visit to Rode Heath

 On Friday 10th February Siemens visited Y5 and Y6. For the second time, they have managed to impress us all. They came with lots of Lego, designed to create a cart once put together. The competition was based on teamwork. Each team had a total of 12 members in it.

There were 7 operators, who each had a part in making the car. Their job was to make as many cars as they could before the time ran out. There were 2 quality checkers: one who looked at how well the vehicle functioned and the other on how it looked. Finally, there were the store workers and the line servers. Because the operators only had a few of what they needed, the store workers got any extra supplies that they needed and the line severs took them to the person who needed them.   

After the first run, we were allowed to make some changes to try and improve our performance. Surprisingly, we then managed to make more in 4 minutes than we had made in 8 minutes.

We are now in suspense to find out which team won!

Isobelle Jenkins
Year 5

img_5961

HOW TO SAVE TIME AND MAKE THINGS EASIER!

What you used to do:

  • When you get up to get some colouring pencils you probably used to get them 1 or 2 at a time and then went up again to get some more. This is wasting time and effort.
  • When you were doing a test you probably found a question where you were struggling and spent ages on it. This is not good as it wastes time and you might not get all the questions done.
  • When at home and making a hot chocolate, you usually get your water and put it in the kettle and then you turn the kettle on. Then you wait for it to finish. Next you probably go and get your cup and then pour the water into the cup and go back to the cupboard and get out you hot chocolate and then walk back and so on. This is wasting your energy and wasting your time.

What you need to do:

  • When you get up to get the colouring pencils, make sure to get all the pencils you need at one time. This is saving time and energy.
  • When you are doing a test, if you get stuck on a question, go on to the next one. You are saving time.
  • While the kettle is boiling, go and get the things that you need so that you don’t waste time afterwards.

By Claris and Megan


sie_logo_petrol_cmyk-002

So, what did the Siemens representatives think about the children’s efforts?

Jo and I thoroughly enjoyed the day and everyone worked brilliantly.
All the teams made pretty much the same changes to improve the process:

  • Work areas rearranged to improve the flow of production
  • Material moved line side to remove lost time waiting around.

With these changes the children produced more in half of the time that they had previously been allocated.  Something that they didn’t believe could be done at first !

The winning team was……  LEGO BUSTERS! 

Lego Busters – 43 cars
Popcorn Panda – 41 cars
Lego Masters – 38 cars
Pompom1101 – 36 cars
Master Builders – 36 cars

We are already looking forward to running this again in 2018!